
- What MCP Adds to Claude Desktop
- Before You Start
- Step 1: Open Customize
- Step 2: Add a Custom Connector
- Step 3: Enter the Server Details
- Step 4: Connect and Authenticate
- Step 5: Set Tool Permissions
- Prefer the Terminal? Use Claude Code
- Worked Example: What a Good MCP Server Adds
- Troubleshooting
- FAQs
- Related Reading
Claude Desktop is a capable assistant with one stock limitation: on its own, it can only reason and write — it can't reach your database, your deploy target, or a remote service. MCP (Model Context Protocol) is how you close that gap. Connect an MCP server and Claude gains a set of tools it can call: query this, deploy that, run this job.
Claude Desktop handles MCP through connectors. Remote servers — the kind that live at a URL — connect over OAuth with nothing to install and nothing to keep running on your machine. This guide walks the whole flow with screenshots, using the Matagi MCP server as the example because it's a remote server and demonstrates the no-API-key path end to end.
What MCP Adds to Claude Desktop
An MCP server exposes tools — functions the model can call. Once a server is connected, Claude discovers its tools automatically and decides when to use them based on what you ask. A documentation server lets Claude read your docs; a database server lets it run queries; an infrastructure server lets it provision and deploy.
There are two kinds of servers. Local (STDIO) servers run as a process on your machine. Remote (Streamable HTTP) servers live at a URL, install nothing, and follow you across devices. For anything infrastructure-shaped, remote is the better default — and it's what the custom-connector flow below is built for.
Before You Start
You'll need the Claude desktop app installed and you'll need to be signed in. Custom connectors for remote MCP servers are available on Claude's paid plans. Have the server's URL ready — for Matagi that's https://mcp.matagi.ai/mcp. You do not need an API key; authentication happens through OAuth in the browser.
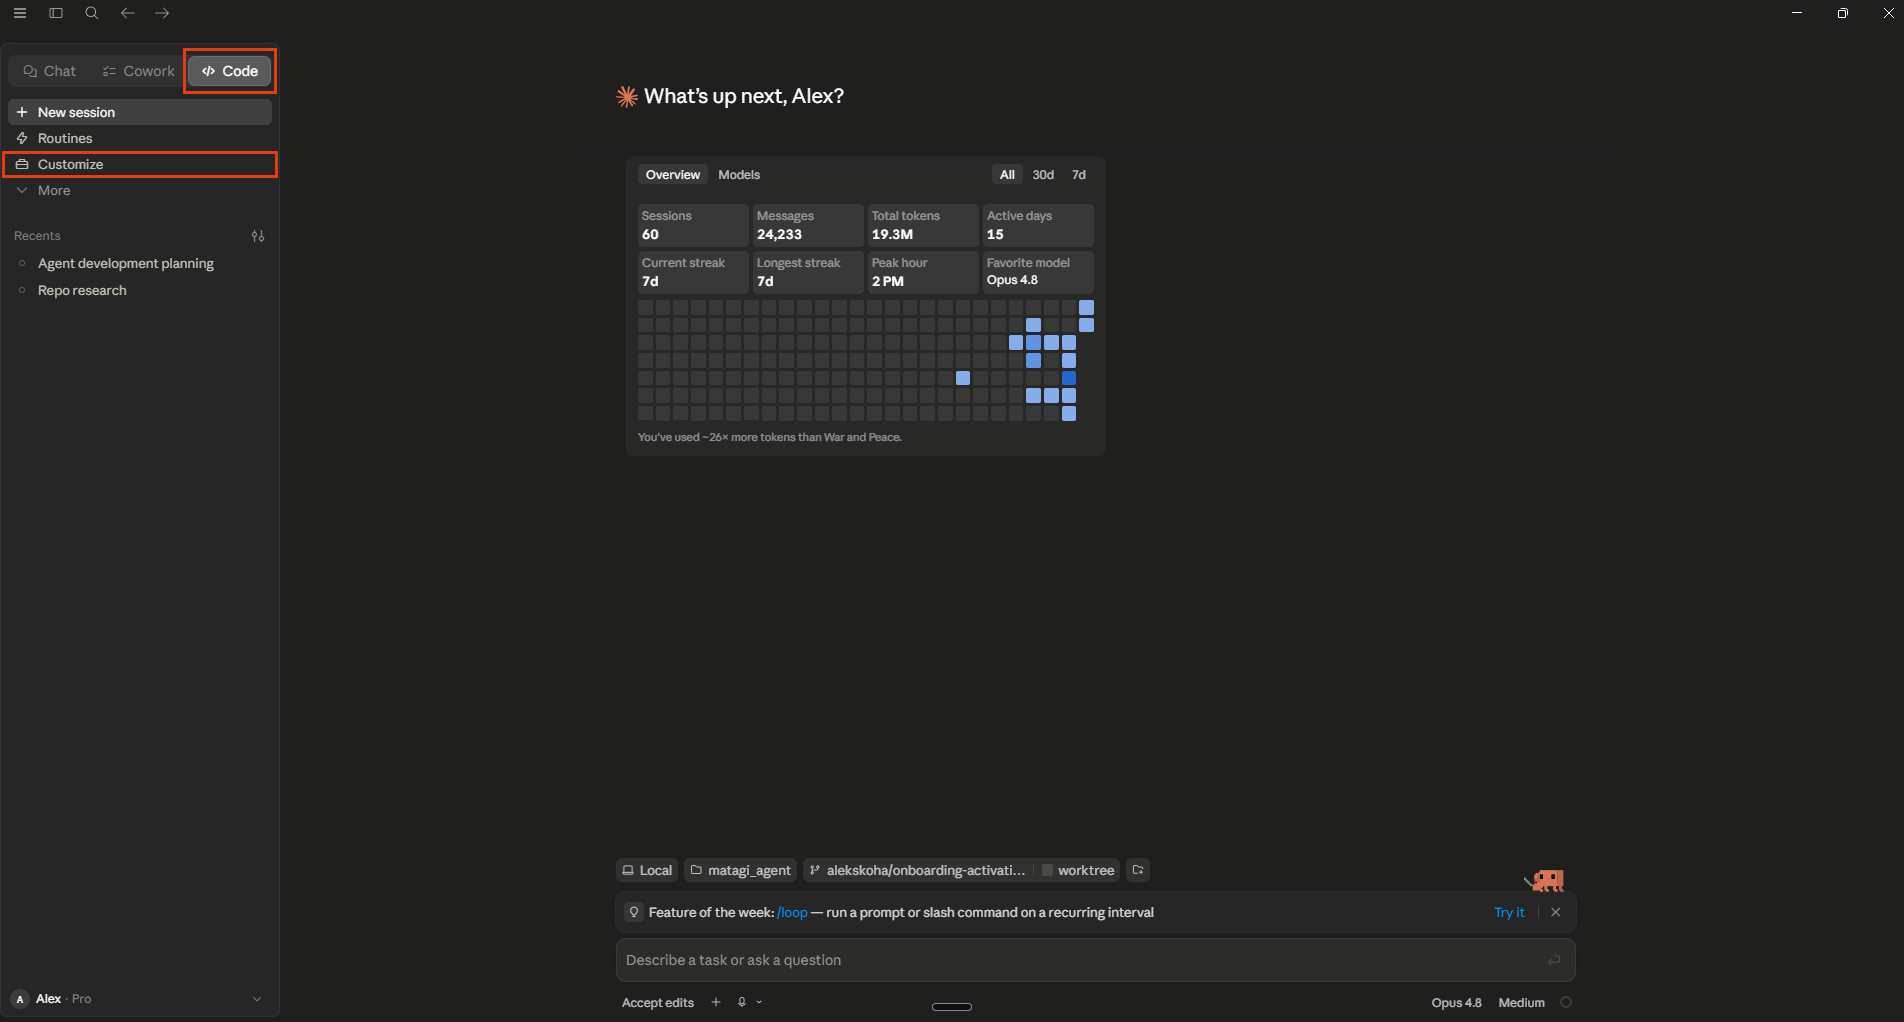
Step 1: Open Customize
Open Claude Desktop and go to Customize in the left sidebar. This is where Skills, Connectors, and plugins live.
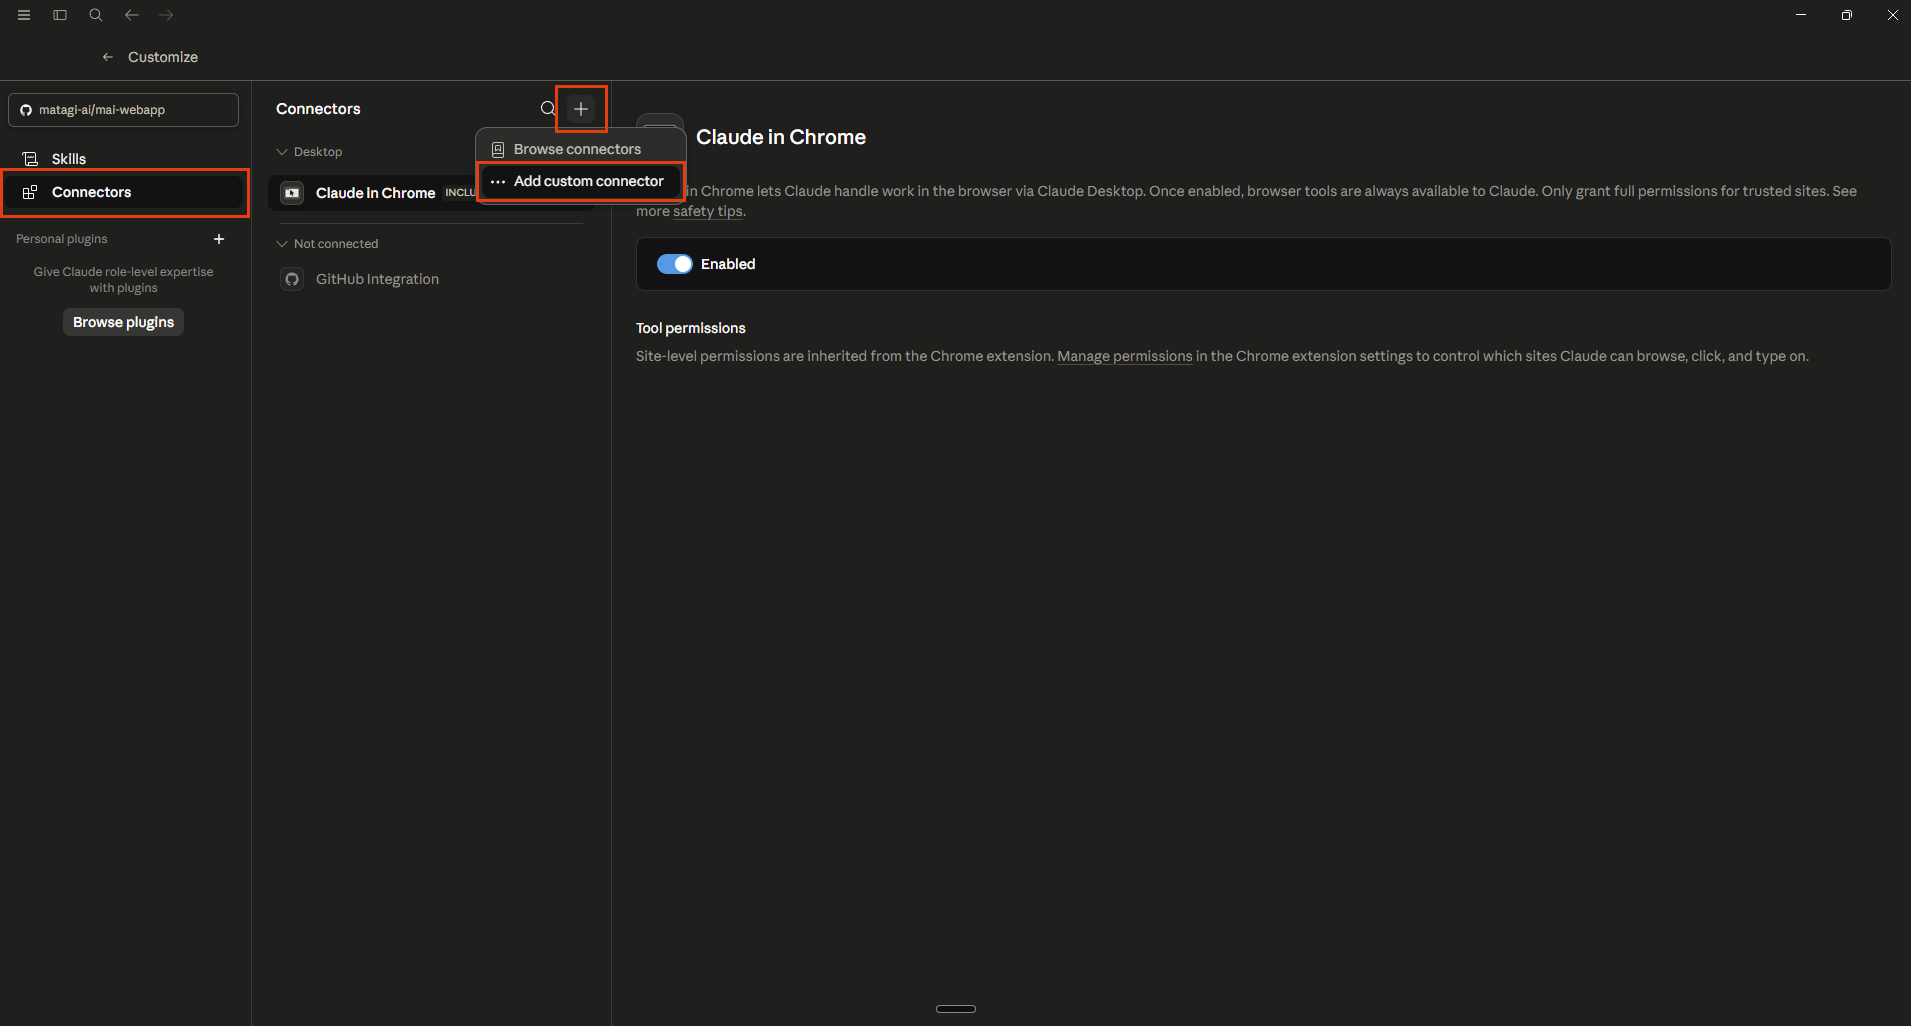
Step 2: Add a Custom Connector
In Customize, select Connectors. At the top of the connectors panel, click the + button and choose Add custom connector from the menu. ("Browse connectors" is the directory of pre-built ones; "Add custom connector" is how you point Claude at any remote MCP server by URL.)
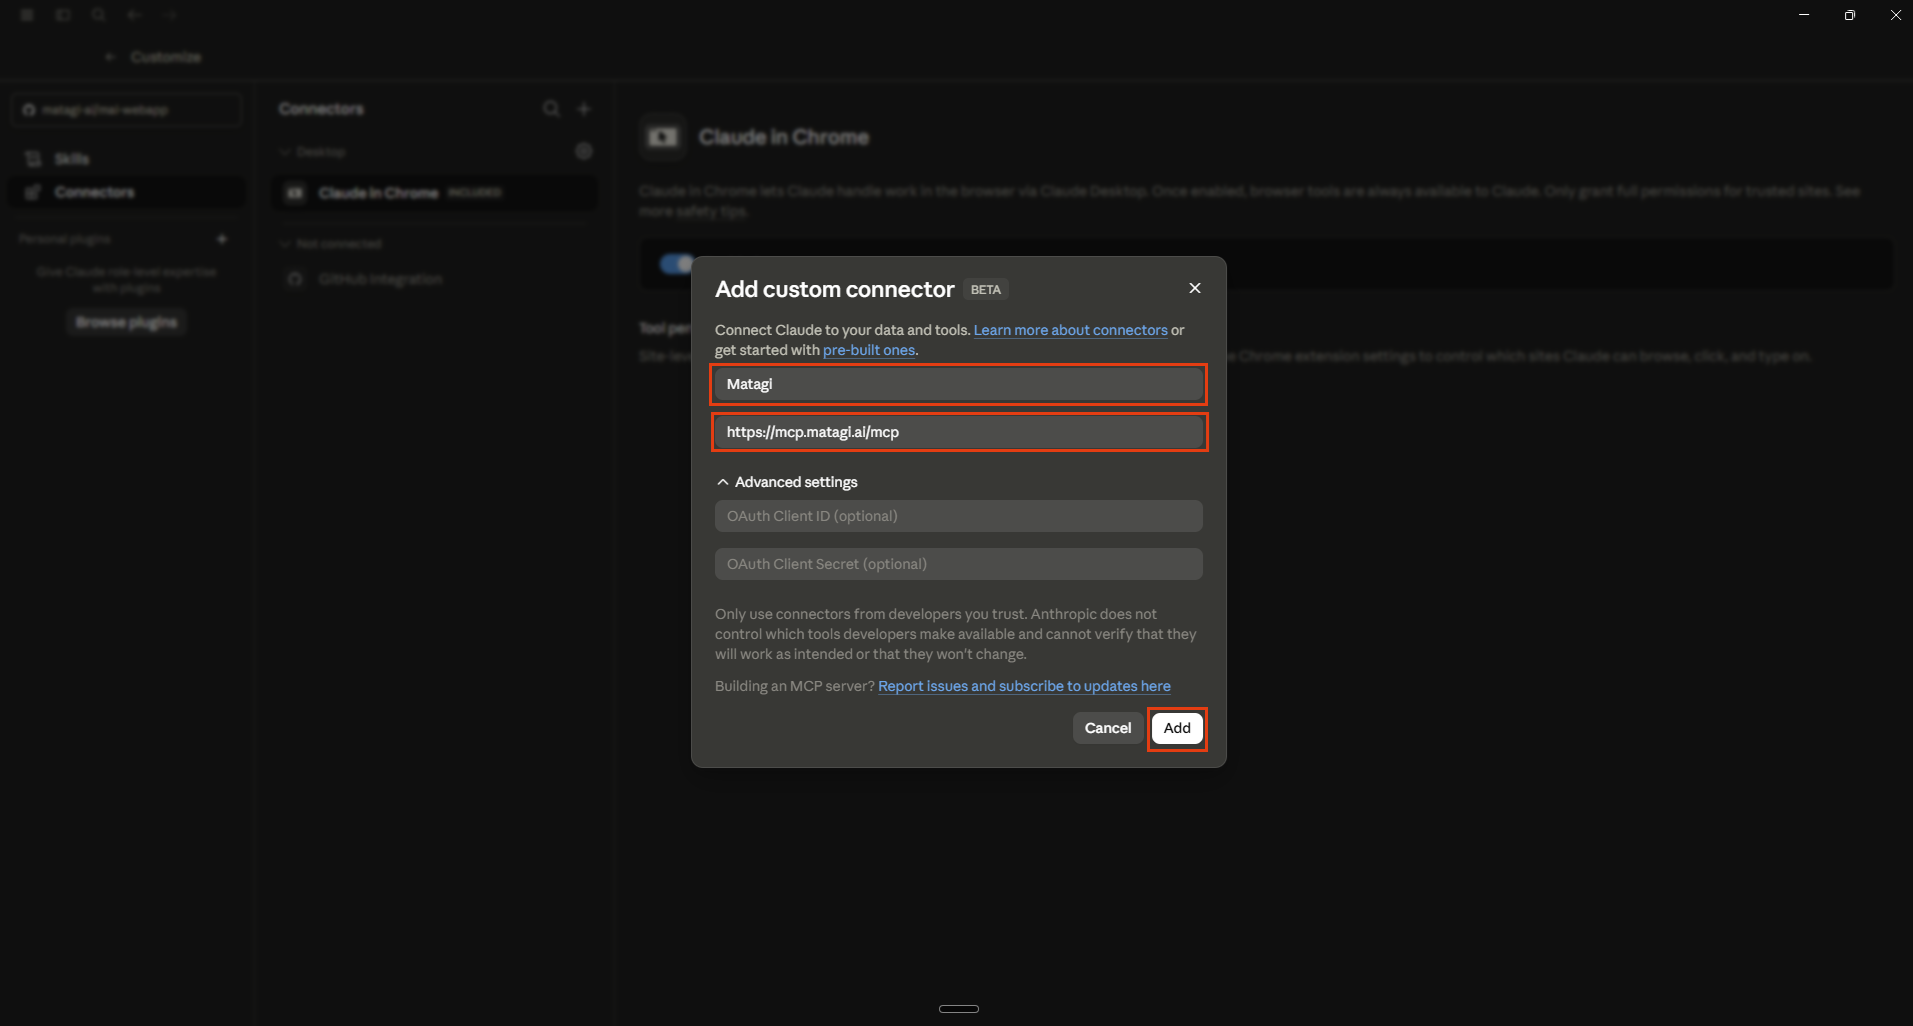
Step 3: Enter the Server Details
In the Add custom connector dialog, give it a name — Matagi — and paste the server URL:
https://mcp.matagi.ai/mcp
Leave Advanced settings (OAuth Client ID and Client Secret) empty. Matagi uses dynamic client registration, so the client registers itself — there's nothing to paste. Click Add.
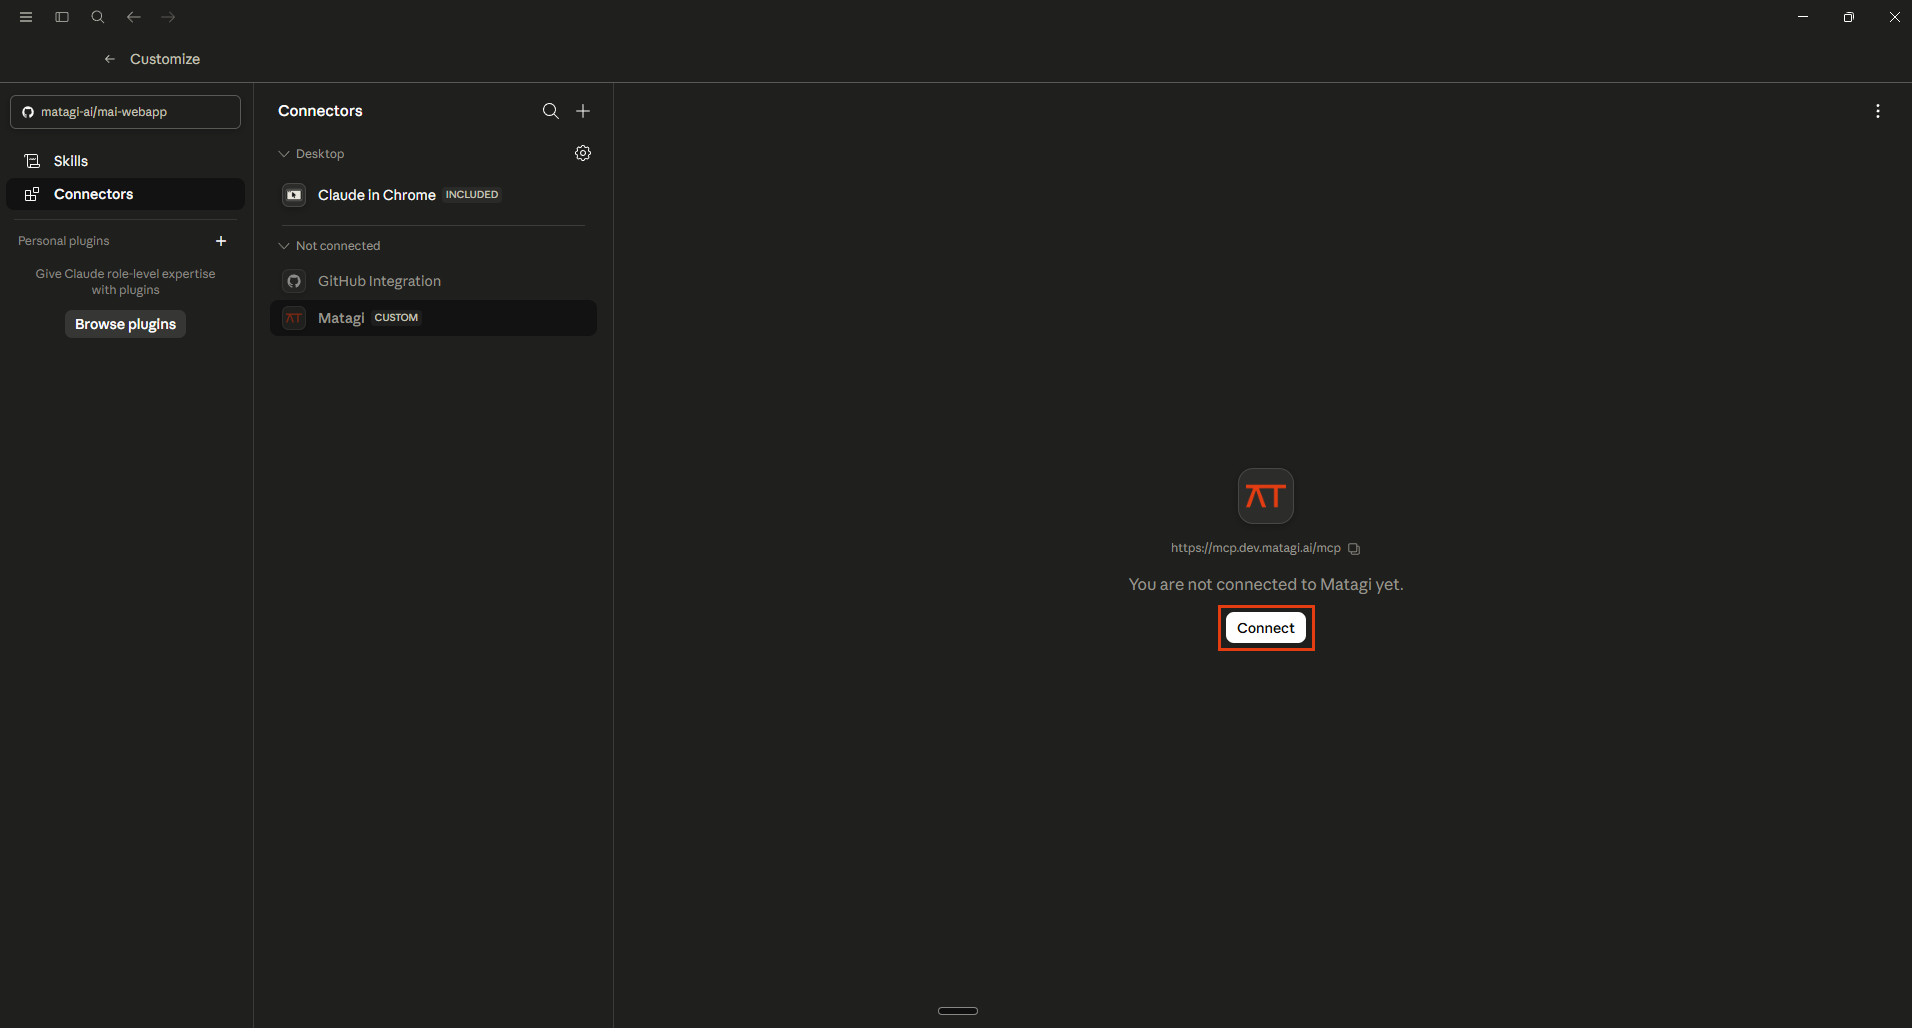
Step 4: Connect and Authenticate
The connector now appears in your list. Open it and click Connect. A Matagi consent screen opens in your browser — sign in with your work email and approve access. If you're new to Matagi, a workspace is created for you with trial credit, so there's no separate signup step. Tokens refresh automatically; you won't be asked again unless you revoke access.
Step 5: Set Tool Permissions
Once connected, Claude shows the server's tools and lets you choose when it's allowed to use them. You can leave tools set to ask for approval on each call, or mark the ones you trust to run automatically. This is the right place to keep destructive tools gated and let read-only tools run freely.
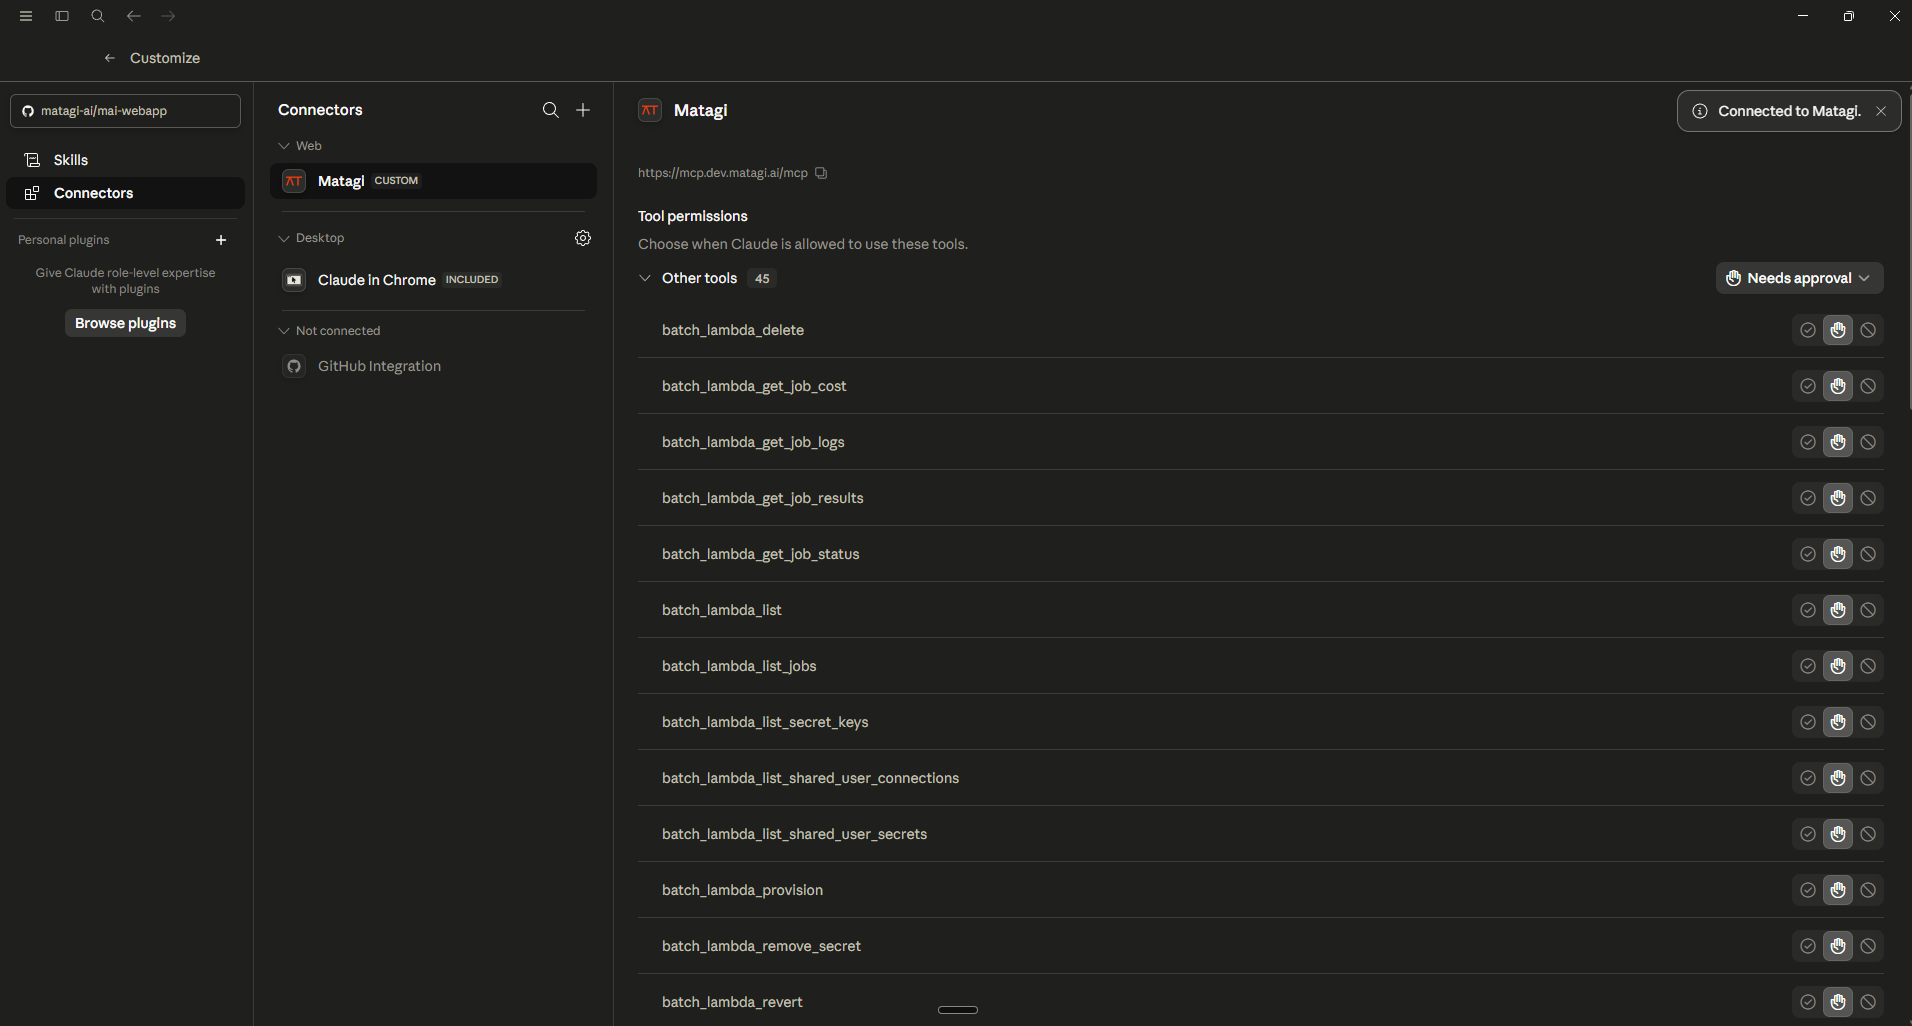
That's it — the tools are live in your Claude Desktop chats.
Prefer the Terminal? Use Claude Code
If you work in Claude Code (the CLI) rather than the desktop app, the same remote server is one command:
claude mcp add --transport http matagi https://mcp.matagi.ai/mcp
Then run /mcp inside Claude Code and select matagi to open the consent screen. Same endpoint, same workspace — the connection just follows you between the app and the terminal.
Worked Example: What a Good MCP Server Adds
What you connect matters more than how. Most MCP servers make Claude better at reading — docs, schemas, issues. The bigger unlock is a server that lets Claude finish the job.
With Matagi connected, ask Claude to build something real — "stand up a waitlist API with a Postgres database behind it and deploy it" — and it can provision the database (isolated, per-workspace), deploy the function, register a schedule if the job recurs, and hand you a working URL. Anything it touches on the outside goes through Matagi's proxy, so API keys and OAuth tokens are injected server-side and never land in the generated code or the model context. Claude goes from describing a plan to shipping one. Review what it built before pointing real traffic at it — verify, don't trust.
Troubleshooting
The connector is added but no tools show up. Reopen the connector and make sure it says connected; if it stalls, disconnect and click Connect again. Tool lists are fetched after authentication.
The OAuth window never opened. Some setups block the pop-up. Click Connect again, or check that your default browser can open; the consent URL will surface so you can open it manually.
Claude asks to approve every tool call. That's the default. In the connector's tool-permissions panel (Step 5), set the tools you trust to run without asking.
"STDIO vs Streamable HTTP" confusion. If a guide tells you to enter a command and arguments, it's describing a local server. A remote server like Matagi needs only the URL — the custom-connector dialog handles the rest.
Custom connector option is missing. Custom connectors require a paid Claude plan and a recent app version. Update the app and confirm your plan.
FAQs
Does Claude Desktop support remote MCP servers? Yes. Custom connectors are built for remote (Streamable HTTP) servers reached by URL with OAuth — no local process required.
Do I need an API key? No. Authentication is OAuth in the browser. For servers with dynamic client registration, like Matagi, you don't paste anything into the advanced fields.
Is this the same as Claude Code?
No — Claude Desktop is the app and uses connectors; Claude Code is the CLI and uses claude mcp add. Both reach the same remote server and, with Matagi, the same workspace.
How many connectors should I add? Fewer than you'd think. Every server's tool descriptions consume context. Two or three you actually use beat ten you don't.
Is it safe to give Claude infrastructure tools? Matagi scopes everything to your workspace, keeps credentials in a server-side proxy (never in code or model context), and logs every action. Keep destructive tools gated and review output before it matters — verify, don't trust.
Related Reading
- How to Add MCP Servers to OpenAI Codex (CLI + Desktop)
- How to Connect ChatGPT to an MCP Server (Developer Mode)
- How to Add an MCP Server to Cursor
- Claude Scheduled Tasks: How to Run Claude on a Schedule
- Postgres MCP Server: Give Your AI a Database Without the Setup
Give Claude Desktop hands: connect the Matagi MCP server — add https://mcp.matagi.ai/mcp as a custom connector, sign in once, and infrastructure plus 3,000+ tools become things Claude can actually do.
Build your first AI agent free
Describe what you want done in plain English. Matagi provisions the infrastructure, wires the integrations, and deploys it.
Get started